


The Digital Front Door: Why API Security is Non-Negotiable
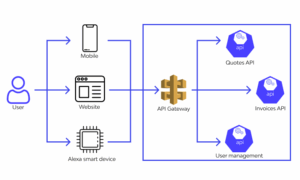
In today’s interconnected digital landscape, Application Programming Interfaces (APIs) are the backbone of modern software. They are the invisible threads that connect everything from mobile apps to complex microservices architectures, enabling seamless data exchange and functionality. Whether you’re building a cutting-edge travel tech platform or a simple web service, APIs act as the digital front door to your application’s data and logic. However, this critical role also makes them a prime target for malicious actors. A single compromised API can lead to catastrophic data breaches, service disruptions, and a complete loss of user trust. The rise of Cloud Networking, DevOps, and distributed systems has only amplified the importance of a robust API security strategy.
Effective API security is not a single tool or a one-time checklist; it’s a multi-layered, continuous process that must be integrated into the entire lifecycle of your application. It involves securing the entire network stack, from the physical Network Devices up to the Application Layer of the OSI Model where protocols like HTTP and HTTPS operate. This guide provides a comprehensive overview of API security, covering core concepts, practical implementation examples, advanced techniques, and industry best practices to help you build resilient and secure services.
Section 1: The Pillars of API Security – Authentication and Authorization
At the heart of API security are two fundamental concepts: Authentication and Authorization. While often used interchangeably, they serve distinct and crucial purposes. Understanding the difference is the first step toward securing your endpoints.
Authentication: Verifying “Who You Are”
Authentication is the process of verifying the identity of a client (a user, a service, or another application) attempting to access your API. The system needs to be certain that the requester is who they claim to be. The simplest form of authentication is using an API key—a unique string that identifies the calling application. While basic, it’s a common starting point.
Consider a simple Python API built with the Flask framework. Here’s how you might implement a basic API key check using a custom decorator. This function inspects the x-api-key header in the incoming HTTP request and compares it against a stored, valid key.
from functools import wraps
from flask import Flask, request, jsonify

app = Flask(__name__)

# In a real application, this should be stored securely, not hardcoded!
VALID_API_KEYS = {
    "secret-key-12345": "ServiceA",
    "secret-key-67890": "ServiceB",
}

# Decorator for API key authentication
def require_api_key(f):
    @wraps(f)
    def decorated_function(*args, **kwargs):
        api_key = request.headers.get('x-api-key')
        if api_key and api_key in VALID_API_KEYS:
            return f(*args, **kwargs)
        else:
            return jsonify({"error": "Unauthorized. Invalid or missing API Key."}), 401
    return decorated_function

@app.route('/api/v1/data')
@require_api_key
def get_data():
    """This endpoint is protected by an API key."""
    return jsonify({"message": "Here is your sensitive data."})

if __name__ == '__main__':
    app.run(debug=True)
Authorization: Confirming “What You Can Do”
Once a client has been authenticated, the next step is authorization. This process determines what actions the authenticated client is permitted to perform. Simply because a user is logged in (authenticated) doesn’t mean they should have access to everything. For example, a standard user might be authorized to read their own data but not modify administrative settings. This is the principle of least privilege in action, a core tenet of Network Security and System Administration.
Authorization often involves checking roles or scopes associated with the authenticated identity. For a REST API, this could mean restricting access to certain HTTP methods (e.g., a user can GET data but not POST, PUT, or DELETE it).
Section 2: Implementing Modern Authentication with JWT and OAuth 2.0
While API keys are useful for simple machine-to-machine communication, modern applications often require more sophisticated, user-centric authentication mechanisms. This is where token-based systems like JSON Web Tokens (JWT) and frameworks like OAuth 2.0 shine, especially in distributed Microservices environments.

JSON Web Tokens (JWT) for Stateless Authentication
A JWT is a compact, URL-safe means of representing claims to be transferred between two parties. It’s a self-contained token that encodes user identity and permissions (claims) within a JSON object. This object is digitally signed, ensuring its integrity. Because the token itself contains the necessary user information, the server doesn’t need to query a database on every request, making JWTs ideal for stateless, scalable API designs.
A JWT consists of three parts separated by dots: header.payload.signature.
- Header: Contains the token type (JWT) and the signing algorithm (e.g., HMAC SHA256 or RSA).
- Payload: Contains the claims, such as user ID, roles, and an expiration timestamp (
exp). - Signature: A cryptographic signature to verify that the sender is who they say they are and that the message wasn’t tampered with along the way.
Here’s a Python example using the PyJWT library to create and validate a JWT. This is a common task for any Network Engineer or DevOps professional working with modern web services.
import jwt
import datetime
from datetime import timezone

# Use a strong, securely stored secret key in a real application
SECRET_KEY = "your-super-secret-key-that-is-not-in-code"

def create_jwt(user_id, roles):
    """Generates a JWT for a given user."""
    payload = {
        'sub': user_id,  # Subject (the user identifier)
        'roles': roles,
        'iat': datetime.datetime.now(timezone.utc),  # Issued at
        'exp': datetime.datetime.now(timezone.utc) + datetime.timedelta(hours=1) # Expiration time
    }
    encoded_jwt = jwt.encode(payload, SECRET_KEY, algorithm="HS256")
    return encoded_jwt

def validate_jwt(encoded_jwt):
    """Validates a JWT and returns the payload if valid."""
    try:
        payload = jwt.decode(encoded_jwt, SECRET_KEY, algorithms=["HS256"])
        return payload
    except jwt.ExpiredSignatureError:
        print("Token has expired.")
        return None
    except jwt.InvalidTokenError:
        print("Invalid token.")
        return None

# --- Example Usage ---
user_id = 123
user_roles = ['user', 'reader']

# 1. Server creates a token upon successful login
token = create_jwt(user_id, user_roles)
print(f"Generated Token: {token}")

# 2. Client sends this token in the 'Authorization: Bearer ' header
# 3. Server validates the token on subsequent requests
decoded_payload = validate_jwt(token)
if decoded_payload:
    print(f"Token is valid. Payload: {decoded_payload}")
OAuth 2.0 for Delegated Authorization
OAuth 2.0 is not an authentication protocol but an authorization framework. It enables a third-party application to obtain limited access to an HTTP service, either on behalf of a resource owner or by allowing the third-party application to obtain access on its own behalf. It’s the standard behind “Log in with Google/Facebook” buttons. In the context of API security, it provides a structured way to grant and manage access permissions (scopes) without sharing user credentials.
Section 3: Advanced Security Measures and Threat Mitigation
Securing an API goes beyond just identifying and authorizing users. You must also protect it from abuse, attacks, and data exposure. This involves a defense-in-depth approach that incorporates multiple layers of protection.
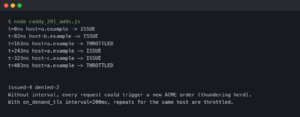
Rate Limiting and Throttling
Rate limiting is a critical defense against Denial-of-Service (DoS) attacks and brute-force attempts. By restricting the number of requests a client can make in a given time period, you can prevent a single user or bot from overwhelming your Network Architecture. Libraries like Flask-Limiter in Python make this straightforward to implement.
from flask import Flask, jsonify
from flask_limiter import Limiter
from flask_limiter.util import get_remote_address

app = Flask(__name__)

# Initialize the rate limiter
limiter = Limiter(
    get_remote_address,
    app=app,
    default_limits=["200 per day", "50 per hour"],
    storage_uri="memory://", # Use Redis in production
)

@app.route("/api/v1/slow")
@limiter.limit("5 per minute") # Override default limit for this specific endpoint
def slow_endpoint():
    return jsonify({"response": "This is a rate-limited endpoint."})

@app.route("/api/v1/fast")
def fast_endpoint():
    return jsonify({"response": "This endpoint has default rate limits."})

if __name__ == '__main__':
    app.run(debug=True)
Input Validation and Output Encoding
Never trust client input. All data received by your API must be rigorously validated to ensure it conforms to the expected format, type, and range. This is your primary defense against injection attacks like SQL Injection (SQLi) and Cross-Site Scripting (XSS). Libraries like Pydantic for Python or Joi for JavaScript can be used to define strict data schemas for your API requests.
from flask import Flask, request, jsonify
from pydantic import BaseModel, ValidationError, constr

app = Flask(__name__)

# Define a Pydantic model for input validation
class UserProfile(BaseModel):
    username: constr(min_length=3, max_length=50)
    email: str

    # Pydantic automatically validates email format

@app.route('/api/v1/users', methods=['POST'])
def create_user():
    try:
        # Parse and validate the incoming JSON
        user_data = UserProfile(**request.json)
    except ValidationError as e:
        # Return a detailed error if validation fails
        return jsonify({"error": e.errors()}), 400

    # If validation passes, proceed with business logic
    # ... create user in database ...
    return jsonify({"message": f"User '{user_data.username}' created successfully."}), 201

if __name__ == '__main__':
    app.run(debug=True)
Similarly, ensure that data sent back to the client (output) is properly encoded to prevent it from being misinterpreted as executable code by a browser.

Always Use HTTPS
Encrypting data in transit is non-negotiable. All API communication must occur over the HTTPS protocol, which uses TLS/SSL to encrypt the HTTP traffic. This prevents man-in-the-middle attacks where an adversary on the network could intercept and read or modify sensitive data, including authentication tokens and personal information. This is a fundamental aspect of Network Security that applies at the Transport Layer of the OSI model.
Section 4: Best Practices for a Secure API Lifecycle
Security should be a continuous concern, from API Design to deployment and maintenance. Here are some essential best practices to follow.
Never Hardcode Secrets
API keys, database credentials, and JWT secret keys should never be committed to your source code repository. A common mistake is leaving credentials in public code, making them easily discoverable. Instead, use environment variables or a dedicated secret management service.
Good Practice: Load secrets from the environment.
import os

# Load the API key from an environment variable
# This is much more secure than hardcoding it in the script.
API_KEY = os.getenv("MY_APP_API_KEY")

if not API_KEY:
    raise ValueError("MY_APP_API_KEY environment variable not set.")

# Use the API_KEY in your application logic...
For production environments, consider using tools like HashiCorp Vault, AWS Secrets Manager, or Google Cloud Secret Manager. These services provide centralized secret management, access control, and audit logging.
Comprehensive Logging and Monitoring
Implement detailed logging for all API requests, especially for failed authentication attempts, authorization failures, and validation errors. This data is invaluable for Network Monitoring and for detecting and responding to security incidents. Monitor API usage patterns and set up alerts for anomalies, such as a sudden spike in requests from a single IP address or a high rate of 4xx/5xx errors, which could indicate an attack in progress.
Automated Security Scanning
Integrate security scanning into your CI/CD pipeline.
- Secret Scanning: Many platforms, including GitHub, offer automated scanning to detect accidentally committed secrets in public and private repositories, helping to prevent leaks before they can be exploited.
- SAST (Static Application Security Testing): Tools that analyze your source code for potential security vulnerabilities without running it.
- DAST (Dynamic Application Security Testing): Tools that test your running application for vulnerabilities by simulating external attacks.
Follow Secure API Design Principles
Adopt a “security-by-design” mindset. Use clear and consistent versioning for your APIs (e.g., /api/v1/). Provide detailed but not overly verbose error messages—avoid leaking internal system details like stack traces in production responses. Adhere to the principle of least privilege for all API keys and user roles.
Conclusion: Security as a Continuous Journey
API security is a critical and multifaceted discipline that is essential for protecting your data, users, and business. It’s not a feature to be added at the end of a development cycle but a foundational principle that must be woven into your entire Network Architecture and software development process. By implementing robust authentication and authorization, enforcing rate limiting, validating all inputs, and encrypting traffic with HTTPS, you can build a strong defensive posture. Combined with best practices like secure secret management and continuous monitoring, you can create APIs that are not only powerful and functional but also resilient against the ever-evolving landscape of cyber threats. The journey to secure APIs is ongoing, requiring vigilance, adaptation, and a commitment to protecting the digital gateways to your services.