

In the intricate world of computer networking, few skills are as fundamental and powerful as subnetting. For anyone involved in network administration, system administration, or even DevOps and cloud networking, a deep understanding of subnetting is non-negotiable. It’s the art and science of dividing a single, large computer network into smaller, more manageable sub-networks, or “subnets.” This practice is the bedrock of modern network design, enabling everything from enhanced security and improved performance to the efficient management of IP addresses. In an era of remote work, sprawling cloud infrastructures, and the Internet of Things (IoT), mastering subnetting is more critical than ever. It’s the key to building scalable, secure, and high-performing networks that power our connected world.
This comprehensive guide will take you on a journey from the foundational principles of IPv4 addressing and binary math to advanced techniques like Variable Length Subnet Masking (VLSM) and Classless Inter-Domain Routing (CIDR). We’ll explore practical, real-world applications, automate calculations with Python, and discuss best practices that network engineers use daily to design and troubleshoot complex network architectures.
Understanding the Building Blocks: IPv4 and Binary
Before you can divide a network, you must first understand its fundamental structure. In the world of TCP/IP, the most common addressing scheme is still IPv4. A solid grasp of its components, and the binary math that underpins it, is the first step toward mastering subnetting.
Deconstructing the IPv4 Address
An IPv4 address is a 32-bit number, which provides a theoretical maximum of 232 (about 4.3 billion) unique addresses. For human readability, this 32-bit number is broken into four 8-bit sections called “octets.” Each octet is represented as a decimal number (0-255), separated by dots. This is known as “dotted-decimal notation.” For example, the address 192.168.1.10.
Every IPv4 address has two distinct parts:
- Network ID: The first part of the address, which identifies the specific network the device belongs to. All devices on the same network share the same network ID.
- Host ID: The second part, which uniquely identifies a specific device (like a computer, server, or smartphone) on that network.
The Role of the Subnet Mask
How does a device know which part of its IP address is the Network ID and which is the Host ID? This is the job of the subnet mask. A subnet mask is another 32-bit number that “masks” the IP address. It uses a sequence of binary 1s to identify the network portion and a sequence of binary 0s to identify the host portion.
For example, a common subnet mask is 255.255.255.0. In binary, this is:
11111111.11111111.11111111.00000000
When a router or computer performs a bitwise AND operation between an IP address and its subnet mask, the result is the Network ID. This process is fundamental to routing decisions at the Network Layer of the OSI model.
Binary Math: The Key to Subnetting
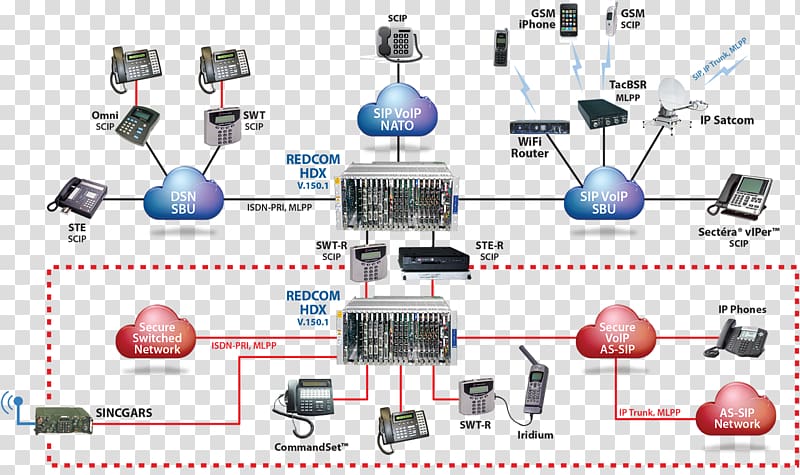
network architecture diagram – Computer network diagram Computer network diagram Network …
To truly understand subnetting, you need to be comfortable with binary. Computers don’t see 192.168.1.10; they see a string of 32 ones and zeros. Converting between decimal and binary is a crucial skill. Here is a simple Python script to demonstrate this conversion, which can be a handy tool for any network engineer.
def ip_to_binary(ip_address):
    """Converts a dotted-decimal IP address to its binary representation."""
    octets = ip_address.split('.')
    if len(octets) != 4:
        return "Invalid IP address format"

    binary_octets = []
    for octet in octets:
        try:
            decimal_value = int(octet)
            if not 0 <= decimal_value <= 255:
                return f"Invalid octet value: {octet}"
            # Format as an 8-bit binary string with leading zeros
            binary_octets.append(f'{decimal_value:08b}')
        except ValueError:
            return f"Invalid octet value: {octet}"

    return ".".join(binary_octets)

# --- Example Usage ---
ip = "192.168.1.10"
subnet_mask = "255.255.255.0"

print(f"IP Address: {ip} -> Binary: {ip_to_binary(ip)}")
print(f"Subnet Mask: {subnet_mask} -> Binary: {ip_to_binary(subnet_mask)}")
Practical Subnetting: Borrowing Bits and Creating Networks
The core concept of subnetting is “borrowing” bits from the host portion of an IP address and reassigning them to the network portion. This extends the network ID, allowing you to create multiple smaller subnets from a single larger network block.
A Step-by-Step Subnetting Example
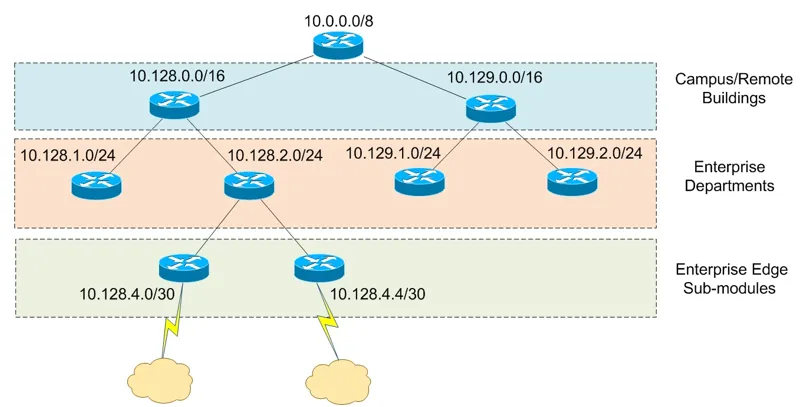
Let’s walk through a common real-world scenario. Imagine you are a network administrator for a startup and have been assigned the network block 172.16.0.0/16. You need to create at least 6 separate subnets for different departments: Engineering, Sales, Marketing, HR, a guest WiFi network, and a server farm.
- Determine the Number of Bits to Borrow: You need 6 subnets. The formula is 2n ≥ (number of required subnets), where ‘n’ is the number of bits to borrow.
- 21 = 2 (not enough)
- 22 = 4 (not enough)
- 23 = 8 (perfect!)
So, we need to borrow 3 bits from the host portion.
- Calculate the New Subnet Mask: The original mask was /16. We are borrowing 3 bits, so the new mask will be /16 + 3 = /19. In dotted-decimal, a /16 mask is
255.255.0.0. A /19 mask is255.255.224.0. - Calculate Subnets and Hosts:
- Number of Subnets: 23 = 8 subnets.
- Number of Hosts per Subnet: The original /16 had 16 host bits (32 – 16). We borrowed 3, leaving 13 host bits (16 – 3). The formula for hosts is 2h – 2, where ‘h’ is the number of host bits. So, 213 – 2 = 8192 – 2 = 8190 usable hosts per subnet. The “-2” accounts for the Network ID and the Broadcast Address, which cannot be assigned to devices.
- List the New Subnets: The “interesting” octet is the third one, where we borrowed the bits. The increment, or “block size,” is 256 – 224 (the value of the third octet in the new mask) = 32. So, our new networks will increment by 32 in the third octet.
- Subnet 1:
172.16.0.0/19 - Subnet 2:
172.16.32.0/19 - Subnet 3:
172.16.64.0/19 - …and so on, up to
172.16.224.0/19.
- Subnet 1:
Automating Calculations with Python
While manual calculation is essential for understanding, in practice, network engineers and DevOps professionals leverage network libraries for speed and accuracy. Python’s built-in ipaddress module is an excellent tool for this kind of network automation.
import ipaddress

# Define the original network
original_network = ipaddress.ip_network('172.16.0.0/16')

print(f"Original Network: {original_network}")
print("-" * 30)

# We need to create subnets with a new prefix of /19 (by borrowing 3 bits)
new_prefix = 19
try:
    subnets = original_network.subnets(new_prefix=new_prefix)

    print(f"Generated Subnets with prefix /{new_prefix}:\n")
    for i, subnet in enumerate(subnets):
        if i >= 8: # Let's just print the first 8 for brevity
            break
        print(f"Subnet #{i+1}:")
        print(f"  Network Address: {subnet.network_address}")
        print(f"  Broadcast Address: {subnet.broadcast_address}")
        print(f"  Number of Hosts: {subnet.num_addresses - 2}")
        # Get the first and last usable IP addresses for hosts
        hosts = list(subnet.hosts())
        print(f"  Usable Host Range: {hosts[0]} - {hosts[-1]}\n")

except ValueError as e:
    print(f"Error: {e}")
This script not only validates our manual calculations but also provides critical information like the usable host range and broadcast address for each subnet automatically, reducing the chance of human error in network design.
Beyond the Basics: CIDR, VLSM, and Real-World Design
Modern network architecture rarely uses simple, uniform subnets. To optimize address allocation and improve routing efficiency, we use more advanced techniques like CIDR and VLSM. These are especially critical in large-scale environments like data centers and cloud networking platforms (e.g., AWS VPCs, Azure VNets).
CIDR (Classless Inter-Domain Routing): The Modern Standard
CIDR, introduced in 1993, eliminated the rigid, class-based system (Class A, B, C) of network addressing. With CIDR, the subnet mask is represented by a “prefix length” (e.g., /19), indicating exactly how many bits belong to the network portion. This provides immense flexibility, allowing network blocks of any size to be allocated, which has been instrumental in slowing the exhaustion of IPv4 addresses. A major benefit of CIDR is route summarization (or supernetting), where multiple smaller routes can be aggregated into a single larger route, significantly reducing the size of routing tables on internet routers and improving overall routing performance.
VLSM (Variable Length Subnet Masking): Optimizing Address Space
VLSM takes subnetting a step further. It allows you to use different subnet masks for different subnets within the same network. This is incredibly efficient. Why assign a subnet with 8,190 available host addresses to a link between two routers that only ever needs two addresses? That’s a massive waste.
network architecture diagram – Keyword of Publication RQ3) What does the keyword network map of …
With VLSM, you can break down a network block according to specific needs:
- Engineering Department: Needs 500 hosts. A /23 subnet (510 usable hosts) is perfect.
- Sales Department: Needs 100 hosts. A /25 subnet (126 usable hosts) is a good fit.
- Server Farm: Needs 50 hosts. A /26 subnet (62 usable hosts) works well.
- Router-to-Router Links: Need only 2 hosts. A /30 subnet (2 usable hosts) is the most efficient choice.
By applying VLSM, you allocate addresses precisely where needed, conserving the limited IPv4 address space. The process involves starting with the largest requirement and carving out that block, then taking the next largest requirement and carving it from the remaining address space.
# This is a conceptual example to illustrate the logic of VLSM.
# A full implementation would require more robust sorting and tracking of available blocks.

import ipaddress

def calculate_vlsm(network_str, requirements):
    """
    A simplified function to demonstrate VLSM allocation.
    `requirements` should be a list of tuples: (name, host_count)
    """
    # Sort requirements from largest to smallest
    requirements.sort(key=lambda x: x[1], reverse=True)

    network = ipaddress.ip_network(network_str)
    available_networks = [network]
    allocations = {}

    print(f"Starting VLSM allocation for {network_str}...\n")

    for name, hosts_needed in requirements:
        # Find the smallest prefix that can accommodate the hosts
        # The formula is 2^(32-prefix) >= hosts_needed + 2
        best_prefix = 32
        for prefix in range(31, 0, -1):
            if (2**(32 - prefix) - 2) >= hosts_needed:
                best_prefix = prefix
            else:
                break

        # Find an available block to allocate from
        allocated = False
        for i, block in enumerate(available_networks):
            if block.prefixlen <= best_prefix:
                # Carve out the new subnet from the start of this block
                new_subnet = next(block.subnets(new_prefix=best_prefix))
                allocations[name] = new_subnet

                # Update the list of available networks
                available_networks.pop(i)
                remaining = list(block.address_exclude(new_subnet))
                available_networks.extend(remaining)
                available_networks.sort() # Keep it sorted

                allocated = True
                break

        if not allocated:
            print(f"Could not allocate {hosts_needed} hosts for {name}. No suitable block found.")

    return allocations

# --- Example Usage ---
# Our company needs subnets for different purposes from the 10.20.0.0/16 block
host_reqs = [
    ("Engineering", 500),
    ("Sales", 100),
    ("Servers", 50),
    ("WAN_Link_1", 2),
    ("WAN_Link_2", 2)
]

allocations = calculate_vlsm("10.20.0.0/16", host_reqs)

for name, subnet in allocations.items():
    print(f"Allocated for {name}: {subnet} ({subnet.num_addresses - 2} usable hosts)")
Applying Subnetting: Best Practices for Secure and Efficient Networks
Subnetting isn't just a theoretical exercise; it's a practical tool with profound implications for network security, performance, and management.
Enhancing Network Security with Segmentation
One of the primary benefits of subnetting is network segmentation. By placing different types of devices on different subnets, you create logical boundaries. This is a cornerstone of a strong network security posture.
- Isolate Critical Systems: Place database servers and internal application backends on a private subnet. They should not be directly accessible from the internet or even from general user subnets. Access can be tightly controlled via firewalls and specific REST API gateways on an application subnet.
- Create a DMZ: A "demilitarized zone" is a special subnet that houses public-facing servers like web and email servers. It's isolated from the internal corporate network, so if a web server is compromised, the attacker doesn't have immediate access to sensitive internal data.
- Guest WiFi: Always put guest wireless networks on their own completely isolated subnet with rules that prevent any access to internal resources.
These boundaries are enforced by routers and firewalls, which can inspect and filter traffic passing between subnets, allowing you to implement granular access control policies.
Improving Network Performance
Every subnet is a separate broadcast domain. A broadcast message (e.g., an ARP request) is sent to every single device within its domain. On a large, flat network, excessive broadcast traffic can create "broadcast storms" that consume significant bandwidth and CPU cycles on every device, degrading network performance and increasing latency. By creating smaller subnets, you drastically reduce the size of each broadcast domain, containing this traffic and ensuring a more efficient and responsive network.
Common Pitfalls and Troubleshooting
Even experienced engineers can make mistakes. When troubleshooting network issues, always check the basics:
- Incorrect Subnet Mask: A device with the wrong subnet mask may be able to reach some hosts but not others, leading to confusing connectivity problems.
- Overlapping Subnets: This is a critical design flaw where two different subnets are configured with address ranges that overlap. This will cause major routing conflicts and unpredictable behavior.
- IP Address Conflicts: Two devices on the same subnet cannot have the same IP address. DHCP servers help prevent this, but statically assigned IPs are a common source of this issue.
Basic network commands are your first line of defense. Using tools like `ping` and `traceroute` can help diagnose reachability, while packet analysis with Wireshark can reveal issues at a much deeper level.
# On Linux/macOS: Check your IP address and subnet mask
# The /24 indicates a 24-bit subnet mask (255.255.255.0)
ip addr show eth0

# On Windows:
ipconfig

# --- Basic Troubleshooting Commands ---

# Test basic connectivity to a device on the same subnet
ping 192.168.1.1

# Test connectivity to a device on a different subnet (tests default gateway)
ping 8.8.8.8

# Trace the route (the sequence of routers) to a destination
# Useful for identifying where traffic is stopping
traceroute example.com
Conclusion: Your Next Steps in Networking
Subnetting is far more than an academic exercise; it is a foundational skill for anyone serious about computer networking. We've journeyed from the binary bits of an IPv4 address to the strategic network design principles of CIDR and VLSM. By breaking large networks into smaller, isolated subnets, you gain immense control over performance, security, and organization. This segmentation is the key to building scalable network architectures that can support everything from a small office to a global cloud-based application.
Your next step is to practice. Use online subnet calculators, experiment with Python's `ipaddress` library to automate your work, and set up a virtual lab using tools like GNS3 or EVE-NG. As you progress, you will see how these principles apply directly to configuring cloud networking environments and designing secure, high-performance systems. Mastering subnetting is an investment that will pay dividends throughout your career in technology.