


The Unsung Hero of the Digital World: Understanding the Transport Layer
In the vast and complex world of Computer Networking, data travels from your device to a server across the globe in the blink of an eye. This seamless experience is made possible by a layered set of rules and protocols known as the TCP/IP suite. While we often interact with the Application Layer through browsers (using the HTTP Protocol) or email clients, the real workhorse ensuring our data arrives intact and in order is the Transport Layer. This is Layer 4 in the OSI Model, and it acts as the bridge between application processes and the underlying Network Layer (where protocols like IP handle addressing and routing).
The Transport Layer is responsible for end-to-end communication, providing logical channels for applications. It manages critical tasks like segmenting data, ensuring reliability, controlling data flow, and identifying different application services running on a single host. Whether you’re a Network Engineer designing a robust Network Architecture, a DevOps professional managing Microservices, or a developer building the next great app, a deep understanding of the Transport Layer is non-negotiable. It’s the foundation upon which reliable and performant network applications are built, impacting everything from Network Performance to Network Security and enabling modern realities like Remote Work and the Digital Nomad lifestyle.
Core Concepts: The Building Blocks of End-to-End Communication
At its core, the Transport Layer provides two primary protocols that serve vastly different purposes: the Transmission Control Protocol (TCP) and the User Datagram Protocol (UDP). The choice between them dictates how an application communicates over the network and has profound implications for performance and reliability.
TCP vs. UDP: The Two Pillars of Transport
Transmission Control Protocol (TCP) is the reliable, connection-oriented protocol. Think of it as a registered postal service. Before any data is sent, a connection is formally established using a process called the “three-way handshake.” TCP guarantees that data packets (called segments) arrive in the correct order and without errors. It achieves this through sequence numbers, acknowledgments (ACKs), and retransmission of lost packets. This reliability makes it ideal for applications where data integrity is paramount, such as web browsing (HTTPS Protocol), file transfers (FTP), and email (SMTP).
User Datagram Protocol (UDP) is the opposite. It’s a simple, connectionless protocol that offers no guarantees. Think of it as sending a postcard. You write the message, put an address on it, and drop it in the mailbox. You don’t know for sure if or when it will arrive, or if multiple postcards will arrive in the order you sent them. UDP is fast and has very low overhead because it doesn’t bother with handshakes, acknowledgments, or retransmissions. This makes it perfect for real-time applications like video streaming, online gaming, and voice-over-IP (VoIP), where speed is more critical than perfect reliability and a lost packet is preferable to a delayed one, which would cause stuttering or lag.
Ports and Sockets: The Gateways to Applications
A single computer can run dozens of network-aware applications simultaneously. How does the operating system know that an incoming HTTP request should go to the web server and not the email client? The answer is ports. A port is a 16-bit number (from 0 to 65535) that acts as an endpoint for communication. The combination of an IP address (from the Network Layer) and a port number creates a unique identifier called a **socket**. For example, `192.0.2.1:443` refers to the HTTPS service on the host at `192.0.2.1`. This process of allowing multiple applications to share a single network connection is called multiplexing.
Let’s see how to create a basic TCP socket in Python to connect to a web server and fetch its homepage. This is the fundamental first step in Network Programming.
import socket

# Define the target host and port
target_host = "www.google.com"
target_port = 80  # HTTP port

# 1. Create a socket object
# AF_INET specifies we are using IPv4
# SOCK_STREAM specifies this is a TCP socket
client = socket.socket(socket.AF_INET, socket.SOCK_STREAM)

try:
    # 2. Connect the client to the target host and port
    client.connect((target_host, target_port))
    print(f"Successfully connected to {target_host} on port {target_port}")

    # 3. Prepare and send an HTTP GET request
    # Note: b"" denotes a byte string, which is required for sending data
    request = b"GET / HTTP/1.1\r\nHost: www.google.com\r\n\r\n"
    client.send(request)
    print("Sent HTTP GET request.")

    # 4. Receive the response (up to 4096 bytes)
    response = client.recv(4096)

    # Print the first 300 characters of the response
    print("\n--- Response Received (first 300 chars) ---")
    print(response.decode('utf-8', errors='ignore')[:300])

finally:
    # 5. Always close the connection
    client.close()
    print("\nConnection closed.")
Implementation in Practice: Building with Sockets
Understanding the theory is one thing, but building applications that use the Transport Layer is where the concepts solidify. Socket Programming is the API that allows developers to leverage TCP and UDP directly. Let’s build both a simple TCP server and a UDP client/server pair to see the differences in action.
Building a Simple TCP Echo Server
A TCP server has a specific lifecycle: it must bind to an IP address and port, listen for incoming connections, accept a connection from a client, and then communicate with that client. The following Python code creates a server that listens on port 9999, accepts one connection, receives a message, and echoes it back to the client.
import socket
import threading

# Server configuration
bind_ip = "0.0.0.0"  # Listen on all available network interfaces
bind_port = 9999

# Create a TCP socket
server = socket.socket(socket.AF_INET, socket.SOCK_STREAM)

# Bind the server to the IP and port
server.bind((bind_ip, bind_port))

# Start listening for incoming connections (max 5 in queue)
server.listen(5)
print(f"[*] Listening on {bind_ip}:{bind_port}")

# This is our client-handling thread
def handle_client(client_socket):
    # Receive data from the client
    request = client_socket.recv(1024)
    print(f"[*] Received: {request.decode('utf-8')}")

    # Echo back the message as a response
    response_message = b"ACK: Your message was received!"
    client_socket.send(response_message)

    # Close the client socket
    client_socket.close()
    print("[*] Client connection closed.")

# Main server loop to accept new connections
while True:
    # Accept a new connection from a client
    # This blocks until a connection is made
    client, addr = server.accept()
    print(f"[*] Accepted connection from: {addr[0]}:{addr[1]}")

    # Create a new thread to handle the client connection
    # This allows the server to handle multiple clients concurrently
    client_handler = threading.Thread(target=handle_client, args=(client,))
    client_handler.start()
This server demonstrates the connection-oriented nature of TCP. The `server.accept()` call blocks until a client completes the three-way handshake, establishing a dedicated connection for communication.
Working with UDP: A Connectionless Exchange
Now, let’s contrast this with UDP. There is no `listen()` or `accept()` call. The UDP server simply binds to a port and waits for datagrams to arrive from any source. The client doesn’t `connect()`; it just sends a datagram to the server’s address and port.
import socket

# --- UDP Server ---
def run_udp_server():
    server_ip = "127.0.0.1"
    server_port = 12000

    # Create a UDP socket (SOCK_DGRAM)
    server_socket = socket.socket(socket.AF_INET, socket.SOCK_DGRAM)

    # Bind to the address and port
    server_socket.bind((server_ip, server_port))
    print("UDP server is ready to receive.")

    # Loop forever to wait for datagrams
    while True:
        # Receive data and the client's address
        message, client_address = server_socket.recvfrom(2048)
        print(f"Received message from {client_address}: {message.decode()}")

        # Modify the message and send it back
        modified_message = message.decode().upper().encode()
        server_socket.sendto(modified_message, client_address)

# --- UDP Client ---
def run_udp_client():
    server_name = "127.0.0.1"
    server_port = 12000

    # Create a UDP socket
    client_socket = socket.socket(socket.AF_INET, socket.SOCK_DGRAM)

    message = input("Input lowercase sentence: ")

    # Send the message to the server
    # No connect() call is needed
    client_socket.sendto(message.encode(), (server_name, server_port))

    # Receive the response from the server
    modified_message, server_address = client_socket.recvfrom(2048)

    print(f"Received from server: {modified_message.decode()}")

    # Close the socket
    client_socket.close()

# To run this, you would typically run the server in one terminal
# and the client in another.
# For demonstration, we'll just show the functions.
# Example usage:
# run_udp_server() # in one process
# run_udp_client() # in another process
print("UDP client and server functions are defined.")
print("Run them in separate processes to test.")
Notice the key difference: `sendto()` and `recvfrom()` are used, which include the destination/source address with each call. This stateless, “fire-and-forget” model is the hallmark of UDP and a core concept in Network Development.
Advanced Techniques and Network Analysis
Beyond basic communication, the Transport Layer incorporates sophisticated mechanisms for performance and reliability. Understanding these and knowing how to analyze them is crucial for Network Troubleshooting and optimization.
Flow Control and Congestion Control
TCP includes mechanisms to prevent a fast sender from overwhelming a slow receiver. This is called **flow control**, and it’s managed using a “sliding window.” The receiver advertises how much buffer space it has available (the receive window), and the sender agrees not to send more data than can be buffered. Additionally, TCP implements **congestion control** to prevent the network itself from being overloaded. Algorithms like TCP Tahoe, Reno, and CUBIC dynamically adjust the sending rate based on perceived network congestion (e.g., detected packet loss), which is critical for maintaining stability on the internet.
Packet Analysis with Wireshark
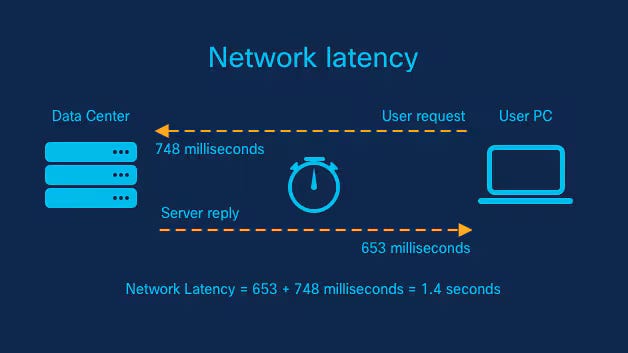
No network professional’s toolkit is complete without Wireshark. This powerful **Packet Analysis** tool lets you capture and inspect the raw data traversing your network interface. By applying a display filter like `tcp.port == 80` or `udp`, you can isolate specific conversations. With Wireshark, you can visualize the TCP three-way handshake, see sequence and acknowledgment numbers in action, identify retransmissions, and analyze Latency issues. It provides an unparalleled, ground-truth view of what’s happening at the Transport Layer and is an indispensable tool for any System Administration or network-focused role.
Crafting Packets with Scapy
For more programmatic control, libraries like Scapy in Python allow you to build and send custom packets from scratch. This is incredibly useful for network testing, security auditing, and protocol implementation. For example, you can craft a single TCP SYN packet to check if a port is open on a remote host (a technique used in port scanners like Nmap).
# You need to install scapy first: pip install scapy
from scapy.all import IP, TCP, sr1

# Define the target IP and destination port
target_ip = "scanme.nmap.org"
dest_port = 80

# Craft the IP and TCP layers of the packet
# op=2 for IP options (optional but common)
# sport is a random source port
# seq is the initial sequence number
# flags='S' indicates this is a SYN packet
ip_layer = IP(dst=target_ip, options=2)
tcp_layer = TCP(sport=RandShort(), dport=dest_port, flags="S", seq=1000)

# Combine the layers into a single packet
packet = ip_layer/tcp_layer

print("Sending SYN packet to", target_ip, "on port", dest_port)

# Send the packet and wait for a single response (sr1)
# The timeout is set to 2 seconds
response = sr1(packet, timeout=2, verbose=0)

# Analyze the response
if response is None:
    print("No response received. Port might be filtered.")
elif response.haslayer(TCP):
    # Check the flags in the TCP layer of the response
    if response.getlayer(TCP).flags == 0x12: # SYN/ACK
        print(f"Port {dest_port} is open!")
        # Send a RST packet to tear down the connection gracefully
        rst_packet = IP(dst=target_ip)/TCP(sport=RandShort(), dport=dest_port, flags="R", seq=response.ack)
        send(rst_packet, verbose=0)
    elif response.getlayer(TCP).flags == 0x14: # RST/ACK
        print(f"Port {dest_port} is closed.")
else:
    print("An unexpected response was received.")
Best Practices, Security, and Modern Networking
Understanding the Transport Layer is not just academic; it directly informs practical decisions in Network Design and security.
Choosing the Right Protocol
The decision between TCP and UDP is a fundamental trade-off.
- Use TCP when: Data integrity and order are critical. Examples: web traffic, file transfers, database connections, secure shell (SSH).
- Use UDP when: Speed and low overhead are the priority, and the application can tolerate some packet loss. Examples: Live video/audio streaming, DNS queries, online gaming.
Transport Layer Security (TLS) and Firewalls
Modern Network Security relies heavily on the Transport Layer. The HTTPS Protocol is simply HTTP layered on top of Transport Layer Security (TLS), which itself runs on top of TCP. TLS uses cryptographic protocols to encrypt the data stream, preventing eavesdropping and tampering. Firewalls, a cornerstone of network defense, operate extensively at Layer 4. They use stateful packet inspection to filter traffic based on source/destination IP addresses and port numbers, allowing, for example, outbound web traffic on port 443 while blocking all other inbound connections. This port-based filtering is a fundamental security practice.
The Transport Layer in Cloud and Microservices
In modern Cloud Networking and Microservices architectures, the Transport Layer’s role is both abstracted and amplified. Technologies like a Service Mesh (e.g., Istio, Linkerd) operate as a dedicated infrastructure layer on top of TCP, managing inter-service communication. They provide features like mutual TLS for security, intelligent routing, and resilience (e.g., retries, circuit breakers) without requiring changes to the application code. Similarly, Load Balancing solutions distribute incoming TCP connections across multiple backend servers to ensure high availability and scalability, a critical component of any robust Network Architecture.
Conclusion: The End-to-End Foundation
The Transport Layer is the diligent, detail-oriented manager of the network stack. It takes the “best-effort” delivery service of the Network Layer and transforms it into a useful communication channel for applications, offering a choice between the guaranteed, orderly delivery of TCP and the lightweight, high-speed transmission of UDP. From Socket Programming fundamentals to advanced Packet Analysis, mastering this layer is essential for anyone in technology. A solid grasp of its principles is the key to building performant applications, troubleshooting complex network issues, and designing secure, scalable systems. In our increasingly connected world, where Network Performance and reliability underpin everything we do, the Transport Layer remains a critical and fascinating field of study.