


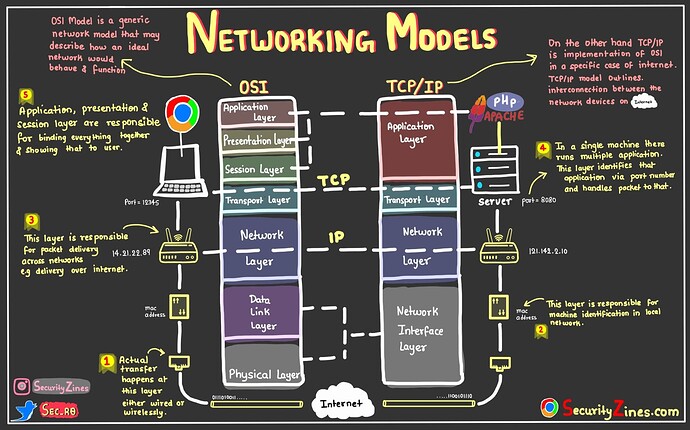
Introduction to the OSI Model in Modern Networking
In the vast landscape of Computer Networking, few concepts are as fundamental and enduring as the Open Systems Interconnection (OSI) model. Whether you are a seasoned Network Engineer, a DevOps Networking specialist, or a software developer diving into Network Programming, understanding the OSI model is non-negotiable. It provides the universal language for how different computer systems communicate with each other.
The OSI model breaks down network communication into seven abstract layers, stacking them from the physical hardware up to the user-facing software. While the TCP/IP model is the practical standard used in the real world (specifically for the Internet), the OSI model remains the theoretical framework for Network Architecture, Network Design, and most importantly, Network Troubleshooting. When a connection fails, knowing which layer is responsible—whether it’s a loose Ethernet cable or a misconfigured REST API—is the key to rapid resolution.
In this comprehensive guide, we will dissect the seven layers of the OSI model, explore how they interact with modern technologies like Cloud Networking and Microservices, and provide practical Python code examples to demonstrate how these concepts manifest in actual software development. From the physical signals of WiFi to the complexities of the HTTP Protocol, we will cover the full spectrum of data transmission.
Section 1: The Upper Layers – Software and Application Logic
The top three layers of the OSI model—Application, Presentation, and Session—are often grouped together in modern contexts as the “Software Layers.” These are the layers closest to the end-user and are the primary playground for web developers and API designers.
Layer 7: The Application Layer
The Application Layer is the interface between the software application and the network. It is not the application itself (like a web browser), but the protocols the application uses to communicate. Key players here include the HTTP Protocol, HTTPS Protocol, DNS Protocol, and SMTP for email. In the era of Web Services and Service Mesh architectures, Layer 7 is where Load Balancing and API Security decisions are often made.
When you design a REST API or utilize GraphQL, you are operating strictly within Layer 7. Let’s look at a practical example of Layer 7 interaction using Python to make an HTTP request.
import requests
import json

def fetch_api_data(url):
    """
    Demonstrates Layer 7 (Application) interaction using HTTP.
    The 'requests' library handles the lower layer complexities abstractly.
    """
    try:
        # The GET method is a standard HTTP verb defined at the Application Layer
        response = requests.get(url, timeout=5)

        # Check standard HTTP status codes (200 OK, 404 Not Found, etc.)
        if response.status_code == 200:
            print(f"[SUCCESS] Connected to {url}")
            # Parsing JSON is often considered part of Layer 6/7 presentation
            data = response.json()
            return data
        else:
            print(f"[ERROR] Status Code: {response.status_code}")
            return None

    except requests.exceptions.RequestException as e:
        print(f"[NETWORK ERROR] {e}")
        return None

# Example usage with a placeholder API
api_url = "https://jsonplaceholder.typicode.com/todos/1"
result = fetch_api_data(api_url)
if result:
    print(f"Received Data: {json.dumps(result, indent=2)}")
Layer 6: The Presentation Layer
The Presentation Layer acts as the translator for the network. It is responsible for data encryption, compression, and formatting. When you send data over HTTPS, the SSL/TLS encryption/decryption process happens here. This ensures that a Digital Nomad working from a coffee shop using public WiFi can access their bank account securely without exposing credentials to packet sniffers.
This layer also handles data serialization formats like JSON, XML, or Protocol Buffers. If two systems use different character encodings (e.g., ASCII vs. EBCDIC), Layer 6 performs the translation.
Layer 5: The Session Layer
The Session Layer controls the dialogues (connections) between computers. It establishes, manages, and terminates connections between the local and remote application. In modern web development, much of this is handled implicitly by the TCP/IP stack or maintained via session tokens and cookies in the Application layer, but logically, the control of the “conversation” resides here.
Executive leaving office building – Exclusive | China Blocks Executive at U.S. Firm Kroll From Leaving …
Section 2: The Transport and Network Layers – The Engine of Data Flow
Moving down the stack, we enter the realm of System Administration and core Network Engineering. These layers ensure that data actually moves from point A to point B across the internet.
Layer 4: The Transport Layer
The Transport Layer is responsible for end-to-end communication and error recovery. The two primary protocols here are TCP (Transmission Control Protocol) and UDP (User Datagram Protocol).
- TCP: Reliable, connection-oriented. Used for web browsing (HTTP), email, and file transfers. It guarantees delivery via acknowledgments.
- UDP: Unreliable, connectionless, but fast. Used for streaming, VoIP, and gaming where Latency matters more than perfect accuracy.
This layer also introduces the concept of “Ports.” While an IP address identifies a machine, a Port identifies a specific service on that machine (e.g., Port 80 for Web, Port 22 for SSH). Below is an example of Socket Programming in Python, which gives us direct control over Layer 4.
import socket

def start_tcp_server(host='127.0.0.1', port=65432):
    """
    Implements a basic TCP Server (Layer 4).
    Demonstrates binding to a host/port and listening for connections.
    """
    # AF_INET = IPv4 (Layer 3), SOCK_STREAM = TCP (Layer 4)
    with socket.socket(socket.AF_INET, socket.SOCK_STREAM) as s:
        try:
            s.bind((host, port))
            s.listen()
            print(f"[LISTENING] Server is listening on {host}:{port}")

            # Accept a connection (Three-way handshake completes here)
            conn, addr = s.accept()
            with conn:
                print(f"[CONNECTED] Connected by {addr}")
                while True:
                    data = conn.recv(1024)
                    if not data:
                        break
                    print(f"[RECEIVED] {data.decode('utf-8')}")
                    # Echo back the data
                    conn.sendall(data)
        except OSError as e:
            print(f"[ERROR] Port binding failed: {e}")

# To test this, you would need a separate client script or use Telnet/Netcat
# start_tcp_server()
Layer 3: The Network Layer
The Network Layer handles logical addressing and Routing. This is where IPv4 and IPv6 live. Routers operate at this layer, making decisions on the best path for a packet to travel across interconnected networks (the Internet) to reach its destination.
Concepts like Subnetting and CIDR (Classless Inter-Domain Routing) are crucial here. A Network Engineer must calculate subnets to divide a network efficiently, ensuring performance and security. Network Virtualization and SDN (Software-Defined Networking) have revolutionized this layer by allowing network configurations to be managed via code rather than manual hardware configuration.
Section 3: The Physical Reality and Packet Analysis
The bottom layers deal with the physical transmission of data. Understanding these layers is vital for Network Security and diagnosing connectivity issues.
Layer 2: The Data Link Layer
The Data Link Layer provides node-to-node data transfer. It defines how data is formatted for transmission over the physical medium. The primary standard here is Ethernet. Devices are identified by their physical MAC addresses rather than IP addresses.
Switches operate at Layer 2. They receive frames and forward them to the correct port based on the destination MAC address. This layer also handles error detection in the physical transmission using Frame Check Sequences.
Layer 1: The Physical Layer
Executive leaving office building – After a Prolonged Closure, the Studio Museum in Harlem Moves Into …
This is the hardware: Network Cables (Cat6, Fiber Optic), Network Devices, and the radio waves of Wireless Networking. It defines voltages, pin layouts, and signal timing. If you have a bad cable, no amount of software configuration at Layer 7 will fix the issue.

Advanced Technique: Packet Analysis with Scapy
To truly understand how these layers stack (Encapsulation), we can use tools like Wireshark or Python libraries like Scapy to inspect packets. Security professionals use Packet Analysis to detect intrusions or analyze Network Performance.
from scapy.all import *

def analyze_packet_layers():
    """
    Uses Scapy to craft a packet and inspect the encapsulation
    of OSI layers.
    Requires root/admin privileges to run.
    """
    print("Crafting a custom packet...")

    # Layer 3: IP Header (Source to Destination)
    ip_layer = IP(dst="8.8.8.8")

    # Layer 4: TCP Header (Port 80)
    tcp_layer = TCP(dport=80, flags="S") # S = SYN flag

    # Layer 7: HTTP Payload (Raw data)
    payload = "GET / HTTP/1.1\r\nHost: google.com\r\n\r\n"

    # Stacking the layers: IP / TCP / Payload
    packet = ip_layer / tcp_layer / payload

    print("\n--- Packet Summary ---")
    packet.show()

    # In a real scenario, we would send this:
    # send(packet)

if __name__ == "__main__":
    # Note: Scapy usually requires installation: pip install scapy
    # and often requires sudo/admin rights
    try:
        analyze_packet_layers()
    except PermissionError:
        print("Error: Packet crafting requires root/admin privileges.")
    except ImportError:
        print("Error: Scapy library not found. Install via 'pip install scapy'")
Section 4: Best Practices, Security, and Optimization
Understanding the OSI model is essential for implementing robust Network Security strategies and optimizing Bandwidth usage.
Defense in Depth
Security should be applied at every layer of the OSI model:
- Layer 1/2: Port security on switches (MAC filtering) and physical access control.
- Layer 3: Firewalls filtering traffic based on IP addresses and protocols. Use VPN tunnels (IPSec) to secure data over public networks.
- Layer 4: Rate limiting to prevent SYN floods and DDoS attacks.
- Layer 7: Web Application Firewalls (WAF) to inspect HTTP traffic for SQL injection or XSS attacks.
Network Automation and DevOps
Executive leaving office building – Exclusive | Bank of New York Mellon Approached Northern Trust to …
In the age of DevOps Networking, manual configuration is obsolete. Tools like Ansible or Terraform allow for Network Automation. You can define your network state in code. Furthermore, modern monitoring tools utilize Network APIs to pull metrics on Jitter, Latency, and packet loss to ensure optimal Network Performance.
Here is a simple script that a System Administrator might use to monitor the availability of a server (Layer 3 check) and the responsiveness of a web service (Layer 7 check).
import subprocess
import requests
import time

def network_health_check(hostname, url):
    """
    Performs a Layer 3 Ping and a Layer 7 HTTP check.
    Essential for basic Network Monitoring.
    """
    print(f"--- Starting Health Check for {hostname} ---")

    # 1. Layer 3 Check: ICMP Ping
    try:
        # '-c 1' sends 1 packet, '-W 2' waits 2 seconds max
        command = ['ping', '-c', '1', '-W', '2', hostname]
        result = subprocess.run(command, stdout=subprocess.PIPE, stderr=subprocess.PIPE)

        if result.returncode == 0:
            print(f"[L3] Ping to {hostname}: SUCCESS")
        else:
            print(f"[L3] Ping to {hostname}: FAILED")
    except Exception as e:
        print(f"[L3] Error executing ping: {e}")

    # 2. Layer 7 Check: HTTP Status
    try:
        start_time = time.time()
        response = requests.get(url, timeout=3)
        latency = (time.time() - start_time) * 1000 # Convert to ms

        if response.status_code == 200:
            print(f"[L7] HTTP Request to {url}: SUCCESS ({latency:.2f}ms)")
        else:
            print(f"[L7] HTTP Request to {url}: FAILED (Status: {response.status_code})")
    except requests.exceptions.RequestException:
        print(f"[L7] HTTP Request to {url}: TIMEOUT/ERROR")

# Example Usage
network_health_check("google.com", "https://www.google.com")
Troubleshooting with the OSI Model
When diagnosing issues, adopt a “Bottom-Up” or “Top-Down” approach.
Bottom-Up: Is the cable plugged in? (L1) Do we have a link light? (L2) Can we ping the gateway? (L3) Can we telnet to the port? (L4).
Top-Down: Is the browser throwing an error? (L7). If the browser says “DNS Probe Finished,” the issue might be at L7 (DNS) or L3 (Routing to DNS server).
Conclusion
The OSI model is far more than a textbook diagram; it is the structural backbone of the internet and the logical map for Network Development. From the Travel Tech enthusiast setting up a secure remote connection to the enterprise Network Engineer configuring Edge Computing nodes, the layers of the OSI model dictate how data flows.
By mastering these seven layers, you gain the ability to write better Network Libraries, design more efficient API Design patterns, and troubleshoot complex systems with surgical precision. As we move toward Cloud Networking and Software-Defined Networking, the abstraction provided by the OSI model becomes even more critical for visualizing how virtualized services interact with physical infrastructure.
Start applying this knowledge today by using tools like Wireshark to watch the traffic on your own network, or by writing simple Python scripts to interact with different layers of the stack. The deeper your understanding of the OSI model, the more “undetectable” and seamless your network solutions will become.