


Understanding the Blueprint of Digital Communication: An Introduction to the OSI Model
In our hyper-connected world, whether you’re a developer deploying a microservice, a network engineer troubleshooting a latency issue, or a digital nomad relying on a stable Wi-Fi connection in a coffee shop, you’re interacting with a complex web of technologies that make digital communication possible. At the heart of this complexity lies a foundational framework: the Open Systems Interconnection (OSI) model. While not a protocol itself, the OSI model provides a universal language and a conceptual blueprint for understanding how different network protocols and devices interact. It breaks down the daunting task of data transmission into seven manageable, distinct layers.
This article will demystify the OSI model, moving beyond dry theory to provide a comprehensive, practical guide. We’ll explore each layer’s function, illustrate concepts with practical Python code examples, and connect this decades-old model to modern paradigms like Cloud Networking, Software-Defined Networking (SDN), and Network Automation. Understanding this model is not just an academic exercise; it’s a critical skill for effective network design, robust network security, and efficient network troubleshooting in any technology-driven career.
The Seven Layers of the OSI Model: A Conceptual Framework
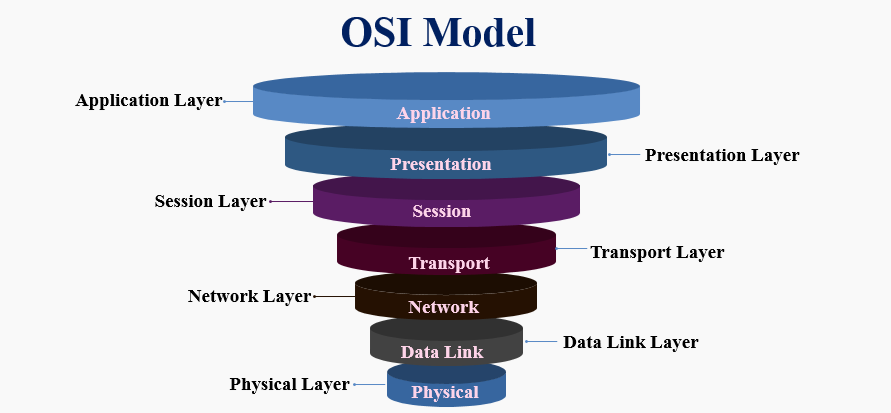
The OSI model is structured into seven layers, each with a specific responsibility. Data flows down the layers on the sending device, a process called encapsulation, and up the layers on the receiving device, called de-encapsulation. A popular mnemonic to remember the layers from bottom (Layer 1) to top (Layer 7) is “Please Do Not Throw Sausage Pizza Away.”
From Physical Wires to Your Application: An Overview
- Layer 7 (Application): The human-computer interaction layer, where applications access network services.
- Layer 6 (Presentation): Ensures data is in a usable format and is where data encryption occurs.
- Layer 5 (Session): Maintains connections and is responsible for controlling ports and sessions.
- Layer 4 (Transport): Provides reliable or unreliable delivery and error correction before retransmission.
- Layer 3 (Network): Responsible for packet forwarding, including routing through different networks.
- Layer 2 (Data Link): A node-to-node data transfer link; it handles framing and MAC addressing.
- Layer 1 (Physical): The physical hardware, such as cables and switches, that transmits raw bit streams.
Layer 7: The Application Layer – The User’s Gateway
This is the layer closest to the end-user. It provides the interface for applications to access network services. When you browse a website, your browser uses the HTTP Protocol or HTTPS Protocol, both Application Layer protocols. Other examples include the DNS Protocol for resolving domain names, FTP for file transfers, and SMTP for email. This layer is all about the data’s meaning and presentation to the user.
Here’s a simple Python example using the requests library to interact with an API at the Application Layer. This code sends an HTTP GET request to retrieve data, a common task in web services and microservices architecture.
import requests
import json

def get_user_data(api_url):
    """
    Makes an HTTP GET request to a specified API endpoint (Application Layer).
    """
    try:
        response = requests.get(api_url)
        # Raise an exception for bad status codes (4xx or 5xx)
        response.raise_for_status()

        print("Successfully fetched data!")
        # The response content is typically JSON data
        user_data = response.json()
        print(json.dumps(user_data, indent=2))

    except requests.exceptions.HTTPError as http_err:
        print(f"HTTP error occurred: {http_err}")
    except requests.exceptions.RequestException as err:
        print(f"An error occurred: {err}")

# Example usage with a public test API
if __name__ == "__main__":
    get_user_data("https://jsonplaceholder.typicode.com/users/1")
Layer 4: The Transport Layer – Ensuring Reliable Delivery
The Transport Layer is the backbone of end-to-end communication. It takes data from the Session Layer, breaks it into smaller segments, and handles flow control and error checking. The two most important protocols here are TCP (Transmission Control Protocol) and UDP (User Datagram Protocol). TCP is connection-oriented, guaranteeing that packets arrive in order and retransmitting lost ones, making it ideal for web browsing and file transfers. UDP is connectionless and faster but doesn’t guarantee delivery, which is suitable for real-time applications like video streaming or online gaming where speed is more critical than perfect data integrity.

From Packets to Sockets: Practical Network Programming
While the upper layers deal with application data, the middle layers are concerned with the logistics of getting that data from point A to point B across potentially vast and complex networks. This is where concepts like IP addressing, routing, and switching come into play, forming the core of Computer Networking.
The Network Layer (Layer 3): The Global Postman
The Network Layer is responsible for logical addressing and routing. It determines the best physical path for the data to take to reach its destination. The key protocol here is the Internet Protocol (IP). This layer uses IP addresses (like IPv4 and IPv6) to uniquely identify devices on a network. Routers operate at this layer, making decisions on where to forward packets based on their destination IP address. Concepts like Subnetting and CIDR (Classless Inter-Domain Routing) are fundamental to efficient Network Addressing and network design.
Let’s bridge the Application and Network layers. Before your browser can send an HTTP request, it needs the server’s IP address. It uses DNS (an Application Layer protocol) to find it. Here’s how you can perform a DNS lookup using Python’s socket library to see this in action.
import socket

def resolve_domain_to_ip(domain_name):
    """
    Resolves a domain name to its IPv4 address using DNS (a Layer 7 service)
    to get a Layer 3 address.
    """
    try:
        ip_address = socket.gethostbyname(domain_name)
        print(f"The IP address for '{domain_name}' is: {ip_address}")
        return ip_address
    except socket.gaierror as e:
        print(f"Could not resolve hostname '{domain_name}': {e}")
        return None

# Example usage
if __name__ == "__main__":
    resolve_domain_to_ip("google.com")
    resolve_domain_to_ip("tryhackme.com")
The Data Link Layer (Layer 2) & Physical Layer (Layer 1)
The Data Link Layer is responsible for node-to-node data transfer on the same local network. It packages bits from the Physical Layer into frames and uses MAC (Media Access Control) addresses, which are unique hardware identifiers burned into network interface cards (NICs). Switches are the primary Network Devices at this layer. Protocols like Ethernet and standards for Wireless Networking (WiFi) operate here.
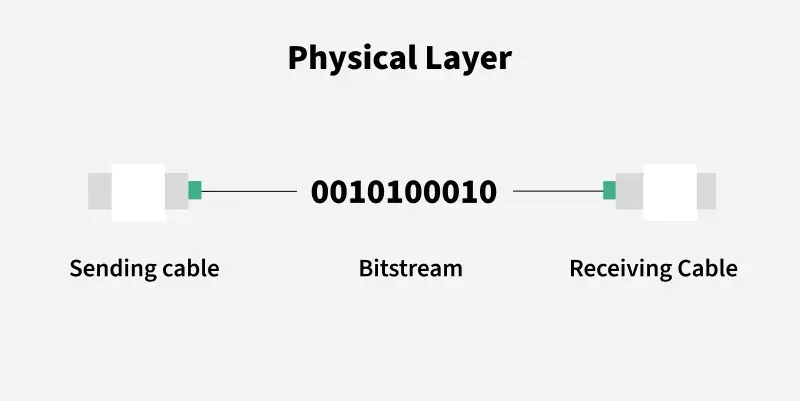
Finally, the Physical Layer is the foundation. It deals with the raw bitstream and the physical medium—Network Cables (like Cat 6 Ethernet), fiber optics, radio frequencies. It’s all about converting digital bits into electrical, radio, or light signals and transmitting them. For a Network Engineer, troubleshooting at this layer means checking for bad cables or faulty hardware.
Troubleshooting and Security Across the Layers
The OSI model is an indispensable tool for Network Troubleshooting. When a service is down, a systematic approach is to check the layers from the bottom up. Is the cable plugged in (Layer 1)? Is the device getting a local network connection (Layer 2)? Can it ping an external address (Layer 3)? Can it establish a TCP connection (Layer 4)? Is a DNS lookup failing (Layer 7)?
Packet Analysis with Wireshark and Scapy
Tools like Wireshark provide a window into network traffic, allowing you to perform deep Packet Analysis and see the headers and data at each layer. For more programmatic control, Python’s Scapy library is incredibly powerful. It allows you to craft, send, and analyze network packets, making it a favorite for network security professionals and developers implementing custom protocols.
Here’s a Scapy example to create and send an ICMP “ping” packet (Layer 3) to check if a host is online.
# You may need to install scapy first: pip install scapy
from scapy.all import IP, ICMP, sr1

def send_ping(destination_ip):
    """
    Crafts and sends a single ICMP (ping) packet to a destination
    using Scapy to interact at the Network Layer.
    """
    # Create an IP packet with the destination IP
    # Create an ICMP packet (echo-request)
    # The '/' operator in Scapy stacks layers
    packet = IP(dst=destination_ip)/ICMP()

    print(f"Sending ICMP packet to {destination_ip}...")

    # Send the packet and wait for one response (sr1)
    # The timeout is set to 2 seconds
    response = sr1(packet, timeout=2, verbose=0)

    if response:
        print(f"Received response from {response.src}:")
        response.show()
    else:
        print("No response received.")

# Example usage
if __name__ == "__main__":
    # Ensure you have the necessary permissions to send raw packets.
    # On Linux, you might need to run this script with sudo.
    send_ping("8.8.8.8") # Pinging Google's DNS server
Network Security: A Layered Approach
Network Security is not a single product but a strategy applied across the OSI model. Firewalls and Access Control Lists (ACLs) operate at Layers 3 and 4, filtering traffic based on IP addresses and port numbers. A VPN (Virtual Private Network) often creates a secure tunnel at the Network Layer. At the Application Layer, a Web Application Firewall (WAF) inspects HTTP requests to protect against attacks like SQL injection. A layered defense is the most effective security posture.
The OSI Model in the Modern Era: TCP/IP, Cloud, and SDN
While the OSI model is a fantastic conceptual guide, the real world largely runs on the simpler, four-layer TCP/IP model. The OSI model’s Application, Presentation, and Session layers are collapsed into a single “Application” layer in the TCP/IP model. However, the principles remain the same, and understanding OSI provides a more granular view that is invaluable for troubleshooting.
Networking in the Cloud and the Rise of SDN
In Cloud Networking (e.g., AWS VPC), the lower layers are abstracted away. You don’t manage physical cables or switches. Instead, you configure virtual networks, subnets, and routing tables through a software interface. This is a direct result of Software-Defined Networking (SDN), an architecture that separates the network’s control plane (which decides where traffic goes) from the data plane (which forwards the traffic). This separation enables powerful Network Automation and Network Virtualization.
Modern DevOps Networking relies heavily on Network APIs, typically REST APIs, to programmatically configure and manage network infrastructure. A network engineer can write a script to automatically update firewall rules or provision a new network segment.
This final example shows how you might use Python to interact with a hypothetical network device’s REST API to add a new firewall rule, a common task in network automation.
import requests
import json

def add_firewall_rule(device_ip, api_key, rule):
    """
    A conceptual example of adding a firewall rule via a REST API.
    This demonstrates Network Automation at the management plane.
    """
    api_url = f"https://{device_ip}/api/v1/firewall/rules"
    headers = {
        "Authorization": f"Bearer {api_key}",
        "Content-Type": "application/json"
    }

    try:
        response = requests.post(api_url, headers=headers, data=json.dumps(rule), verify=False) # In production, use verify=True with proper certs
        response.raise_for_status()

        print("Firewall rule added successfully!")
        print(response.json())

    except requests.exceptions.RequestException as e:
        print(f"Failed to add firewall rule: {e}")

# Example usage
if __name__ == "__main__":
    # This is a hypothetical example. The actual API endpoint, key, and rule
    # format would depend on the network device vendor (e.g., Cisco, Palo Alto).
    new_rule = {
        "name": "Block-Malicious-IP",
        "source_ip": "123.45.67.89",
        "destination_port": "any",
        "action": "deny"
    }

    # In a real scenario, these would be securely managed
    DEVICE_IP = "192.168.1.1"
    API_KEY = "supersecretapikey"

    # add_firewall_rule(DEVICE_IP, API_KEY, new_rule)
    print("Conceptual code executed. In a real environment, this would call the device API.")
Conclusion: The Enduring Relevance of a Foundational Model
The OSI model remains a cornerstone of networking knowledge for a reason. It provides a structured way to think about the complex processes that deliver data from a server in the cloud to the screen in your hand. For the aspiring System Administration professional, the seasoned Network Engineer, or the curious developer, mastering this model transforms networking from a black box into a logical, layered system.
By understanding each layer’s role, you gain the ability to design more resilient network architectures, implement more effective security strategies, and troubleshoot problems with precision. The next time you face a network issue, start by asking, “Which layer is the problem at?” This simple question, guided by the OSI model, is the first step toward a quick and effective resolution.