


In the era of cloud-native computing and microservices, the lines between development, operations, and networking have blurred. Traditional network administration, with its manual ticket-based workflows, is giving way to a more agile, automated, and code-driven approach known as DevOps Networking. At the heart of this transformation is Kubernetes, the de facto standard for container orchestration. While Kubernetes excels at managing application lifecycles, its networking layer can be a complex beast to tame. Understanding how services communicate within a cluster, how they are exposed to the outside world, and how to secure that communication is no longer just a network engineer’s job—it’s a critical skill for any DevOps professional.
This article dives deep into the core components of Kubernetes networking. We will demystify concepts like Services, Ingress, and Network Policies, moving from fundamental principles to advanced implementation details. Through practical examples and best practices, you’ll gain the knowledge to design, build, and secure robust network architectures for your containerized applications, transforming network challenges into a competitive advantage in your software delivery pipeline.
The Foundation: Kubernetes Networking Models and Services
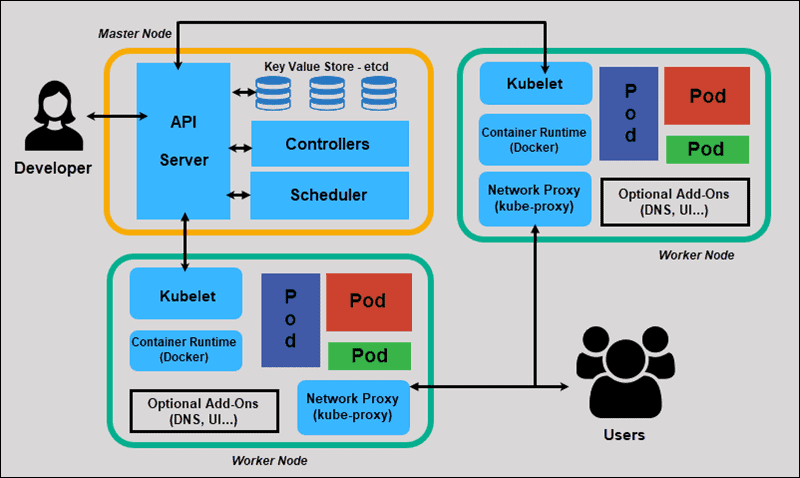
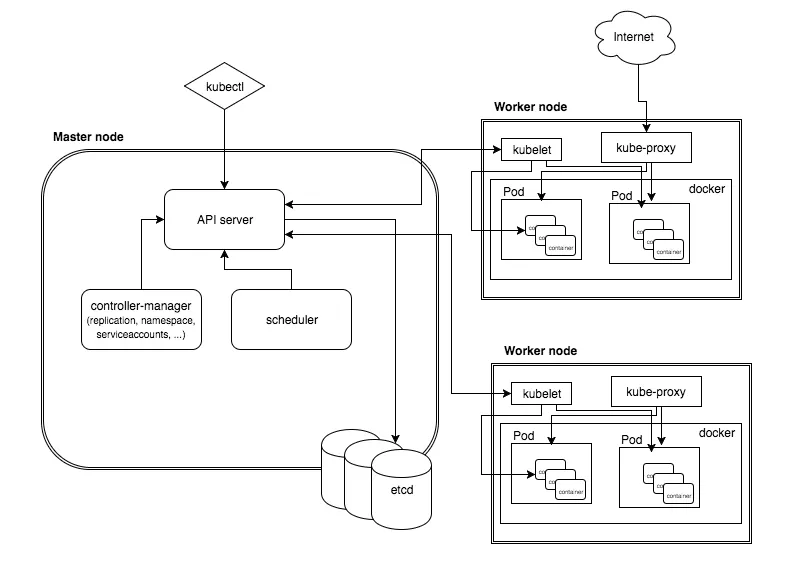
Before exposing applications to the world, we must first understand how they communicate inside the cluster. Kubernetes is built on a flat network model with a few fundamental rules that simplify communication and discovery, forming the bedrock of its powerful networking capabilities.
The Kubernetes Networking Model Explained
The core principle of Kubernetes networking is that every Pod gets its own unique IP address. This isn’t just a recommendation; it’s a requirement for a compliant Kubernetes cluster. This model, typically implemented by a Container Network Interface (CNI) plugin like Calico or Flannel, ensures:
- Unique IP per Pod: All containers within a Pod share the same network namespace and IP address.
- Flat Network: All Pods can communicate with all other Pods on any node without needing Network Address Translation (NAT).
- Agent Visibility: Agents on a node (like the kubelet) can communicate with all Pods on that node.
This design simplifies the developer experience significantly. You don’t have to worry about mapping container ports to host ports, which was a common pain point in older container platforms. Communication feels more like traditional virtual machines, each with its own IP in a large, flat network space.
Abstracting Communication with Services
While direct Pod-to-Pod communication is possible, it’s not practical for real-world applications. Pods are ephemeral; they can be scaled up, down, or rescheduled to different nodes, causing their IP addresses to change constantly. Relying on these transient IPs would make any application brittle.
This is where the Service object comes in. A Service provides a stable, virtual IP address (the ClusterIP) and a DNS name that acts as a durable endpoint for a set of Pods. It uses labels and selectors to dynamically track the healthy Pods that match its criteria. When traffic is sent to the Service’s IP, Kubernetes’ internal load balancer (kube-proxy) distributes it among the ready backend Pods.
Here is a simple YAML manifest for a ClusterIP Service, the default type, which exposes a deployment named ‘my-app’ on a stable internal IP.
apiVersion: v1
kind: Service
metadata:
  name: my-app-service
spec:
  # This is the default type, making the service only reachable from within the cluster.
  type: ClusterIP
  selector:
    # This selector matches the labels on the Pods we want to target.
    app: my-app
  ports:
    - protocol: TCP
      # The port the service will be listening on.
      port: 80
      # The port on the Pods to forward traffic to.
      targetPort: 8080
Other Service types include NodePort, which exposes the service on a static port on each node’s IP, and LoadBalancer, which provisions an external load balancer from a cloud provider (like an AWS ELB or GCP Cloud Load Balancer) to route external traffic to the service.
Exposing Applications: Ingress and Advanced Load Balancing
While a LoadBalancer Service is a simple way to expose an application, it has drawbacks. It typically provisions one expensive cloud load balancer per service and operates at Layer 4 (TCP/UDP) of the OSI model, lacking application-level routing intelligence. For managing HTTP and HTTPS traffic, an Ingress is the more powerful and cost-effective solution.
Intelligent Routing with Ingress Controllers
An Ingress is a Kubernetes API object that defines rules for routing external HTTP/S traffic to internal Services. However, the Ingress resource itself does nothing. It requires an Ingress Controller—a separate application running in the cluster—to read these rules and implement them. Popular Ingress controllers include NGINX, Traefik, and HAProxy.
Ingress controllers act as a reverse proxy and application gateway, offering features like:
- Host-based routing: Directing traffic for
api.example.comto one service andshop.example.comto another. - Path-based routing: Directing
example.com/apito the API service andexample.com/uito the frontend service. - SSL/TLS Termination: Centralizing certificate management and offloading encryption/decryption from your application pods.
This approach allows you to expose many services through a single external IP address and load balancer, significantly reducing costs and simplifying network architecture.
Here’s an example Ingress manifest that routes traffic based on the request path:
apiVersion: networking.k8s.io/v1
kind: Ingress
metadata:
  name: my-app-ingress
  annotations:
    # This annotation is specific to the NGINX Ingress Controller
    nginx.ingress.kubernetes.io/rewrite-target: /
spec:
  rules:
  - host: myapp.example.com
    http:
      paths:
      - path: /api
        pathType: Prefix
        backend:
          service:
            name: api-service
            port:
              number: 80
      - path: /
        pathType: Prefix
        backend:
          service:
            name: frontend-service
            port:
              number: 80
Load Balancing on Bare Metal with MetalLB
A common challenge arises when running Kubernetes on-premises or in a non-cloud environment: the type: LoadBalancer Service remains in a “pending” state because there’s no cloud provider to provision an external IP. This is where tools like MetalLB come in. MetalLB is a load-balancer implementation for bare-metal Kubernetes clusters that uses standard network protocols like ARP or BGP to make real, routable IP addresses available to your services. After installing MetalLB, you simply create a ConfigMap to tell it which IP addresses it’s allowed to manage.
apiVersion: v1
kind: ConfigMap
metadata:
  namespace: metallb-system
  name: config
data:
  config: |
    address-pools:
    - name: default
      protocol: layer2
      addresses:
      - 192.168.10.240-192.168.10.250
With this configuration, any Service of type: LoadBalancer will automatically be assigned an IP from the specified range, making on-prem deployments behave just like their cloud counterparts.
Securing the Network: Kubernetes Network Policies
By default, Kubernetes networking is completely open. Any Pod can communicate with any other Pod in the cluster, regardless of namespace. This “default allow” posture is convenient for development but represents a significant security risk in production. A compromised container could potentially access sensitive services like databases or authentication systems. To solve this, Kubernetes provides Network Policies.
Implementing a Zero-Trust Model
Network Policies are like firewalls for your Pods. They allow you to define rules that specify which Pods are allowed to communicate with each other. This enables micro-segmentation and helps implement a zero-trust security model, where no traffic is trusted by default. It’s important to note that Network Policies are enforced by the CNI plugin, so you must use one that supports them, such as Calico, Cilium, or Weave Net.
A typical strategy is to start with a “default deny” policy that blocks all traffic to a set of pods and then layer on more specific “allow” rules for required communication paths.
This policy selects all pods in its namespace and denies all incoming (ingress) traffic:
apiVersion: networking.k8s.io/v1
kind: NetworkPolicy
metadata:
  name: default-deny-ingress
spec:
  # Apply this policy to all pods in the namespace
  podSelector: {}
  policyTypes:
  - Ingress
Once the default deny is in place, you can create specific rules. For example, this policy allows ingress traffic to backend pods only from frontend pods on TCP port 5432.
apiVersion: networking.k8s.io/v1
kind: NetworkPolicy
metadata:
  name: backend-allow-from-frontend
spec:
  # Apply this to pods with the 'app=backend' label
  podSelector:
    matchLabels:
      app: backend
  policyTypes:
  - Ingress
  ingress:
  - from:
    - podSelector:
        matchLabels:
          # Only allow traffic from pods with the 'app=frontend' label
          app: frontend
    ports:
    - protocol: TCP
      port: 5432
By carefully crafting Network Policies, you can create a secure network architecture that strictly limits the blast radius of a potential security breach.
Best Practices and Advanced Considerations
Mastering the basics of Services, Ingress, and Network Policies is crucial, but the journey doesn’t end there. Adopting a true DevOps Networking mindset involves continuous monitoring, automation, and exploring more advanced architectural patterns.
Network Monitoring and Troubleshooting
You can’t manage what you can’t see. Implementing robust network monitoring is essential for maintaining performance and reliability. Tools like Prometheus can scrape metrics from your Ingress controller and CNI plugin to track latency, request rates, and error percentages. Visualizing this data in Grafana provides invaluable insight into your network’s health. For deeper troubleshooting, command-line tools like kubectl exec combined with network utilities like ping and curl are a good start. For advanced packet analysis, you can use tools like Wireshark by running it in a sidecar container or leverage CNI-specific tools like Cilium’s Hubble UI for a visual map of service dependencies and network flows.
Embracing a Service Mesh
As your microservices architecture grows, you may encounter challenges that standard Kubernetes networking primitives don’t fully address, such as end-to-end encryption, advanced traffic shifting (canary deployments, A/B testing), and fine-grained observability. A Service Mesh, like Istio or Linkerd, addresses these needs. It works by injecting a lightweight proxy (a “sidecar”) next to each application container. These proxies intercept all network traffic, providing a control plane to enforce policies, gather telemetry, and manage traffic routing without requiring any changes to your application code.
Automating with Infrastructure as Code (IaC)
Finally, all network configurations—from Services and Ingresses to complex Network Policies—should be managed as code. Storing your YAML manifests in a Git repository and applying them through a CI/CD pipeline ensures your network architecture is versioned, repeatable, and auditable. Tools like Terraform and ArgoCD can further enhance this by managing the entire lifecycle of your network resources declaratively, bringing the full power of Network Automation to your Kubernetes clusters.
Conclusion
DevOps Networking in Kubernetes is a paradigm shift from traditional network management. It empowers teams to build resilient, secure, and scalable network architectures using declarative APIs and automation. We’ve journeyed from the foundational concepts of the Kubernetes network model and the stable abstractions provided by Services, to the intelligent L7 routing of Ingress, and finally to the robust security posture enabled by Network Policies. By mastering these tools, you can effectively manage the flow of traffic within and into your cluster, ensuring your applications are both highly available and secure.
The next step is to apply these concepts. Start by defining Services for your applications, experiment with an Ingress controller in a test environment, and begin crafting basic Network Policies. As you grow more confident, explore advanced tools like MetalLB for bare-metal deployments and consider whether a Service Mesh is right for your organization. The world of cloud-native networking is constantly evolving, and by embracing these principles, you’ll be well-equipped to navigate its complexities.